Pygame 基礎
roychuang
Roy Chuang不會音遊不會競程不會數學什麼都不會的笨沒有技能樹不會寫遊戲也不會寫 python 所以來當 pygame 講師
講師介紹
0. 基礎中的基礎
0. 基礎中的基礎
我猜沒人要聽- Python 中可以用來寫 2D 遊戲的模組
- 其實有更多更強大的東西
例如: Cocos2d Unity Unreal Engine 等等 - 但是 pygame (應該吧) 比較適合新手使用
什麼是 Pygame

1. 動畫的原理
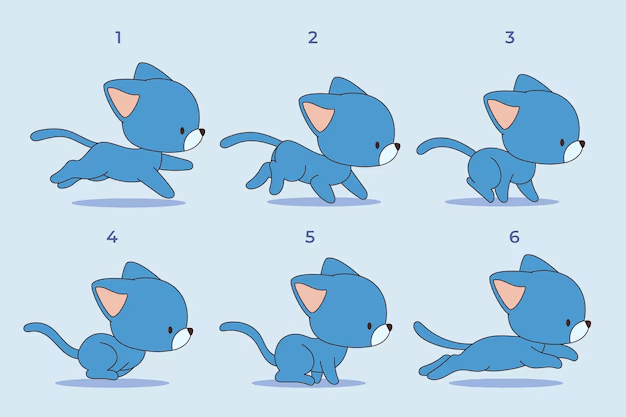
透過每一張圖片 (幀) 的切換來達到動畫效果
幀率 (FPS) 越高代表切換速度越快 -> 動畫越順
0. 基礎中的基礎
先備知識
2. 電腦螢幕上的坐標系
以左上角為 (0, 0)
0. 基礎中的基礎
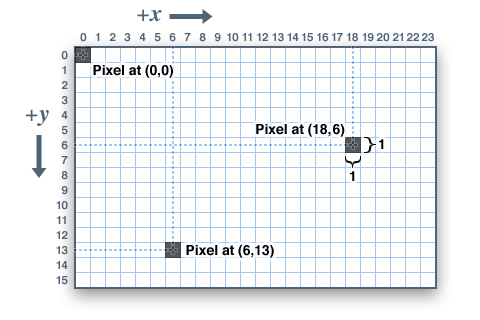
y 軸的方向跟數學上的方向相反
先備知識
3. RGB 混色系統
複習一下各位國中學的三原色
0. 基礎中的基礎
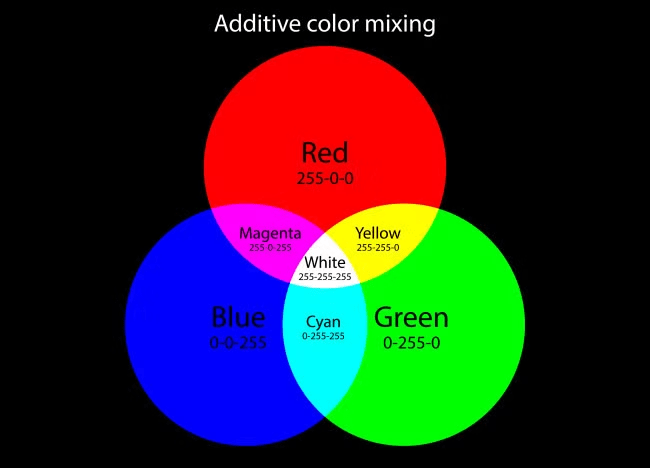
在螢幕上,我們會用三種色光分別的亮度來表示顏色
亮度用 0 ~ 255 的數字表示,數字越大越亮
用 (R, G, B) 的順序寫完後,用小括號包起來
先備知識
3. RGB 混色系統
一些常用的顏色
0. 基礎中的基礎
# 顏色的 RGB 色碼
BLACK = (0, 0, 0)
WHITE = (255, 255, 255)
CYAN = (0, 255, 255)
YELLOW = (255, 255, 0)
PURPLE = (255, 0, 255)
這個網站可以找到更多顏色:
先備知識
0. 基礎中的基礎
1. 打開 Terminal (cmd.exe) 輸入這個指令
安裝 pygame
2. 用這行程式碼測試你的 pygame 有沒有裝成功
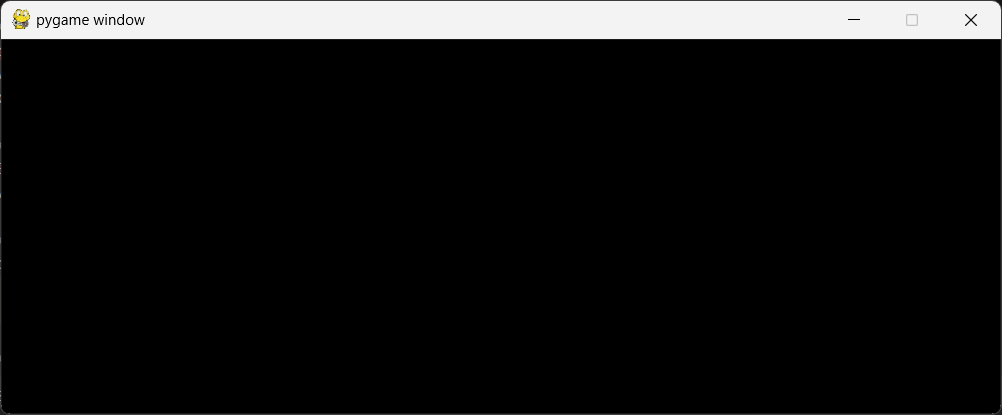
pip install pygameimport pygame有 Hello 訊息就代表成功了

如果出現這個
ModuleNotFoundError: No module named 'pygame'
記得一定要找講師求救
好欸 你成功做出你的第一個遊戲了
第一個遊戲 ?
# 引入函式庫
import pygame
import sys

# 設定常數
WINDOW_WIDTH = 800
WINDOW_HEIGHT = 300
FPS = 60

# 建立 pygame 視窗
pygame.init()
window = pygame.display.set_mode((WINDOW_WIDTH, WINDOW_HEIGHT))
clock = pygame.time.Clock()

# 顏色的 RGB 色碼
BLACK = (0, 0, 0)
WHITE = (255, 255, 255)

# 主迴圈
while True:
    for event in pygame.event.get(): # 事件擷取
        # 退出操作
        if event.type == pygame.QUIT:
            pygame.quit()
            sys.exit()

    # 每幀該做的事情
    window.fill(BLACK) # 清空畫布
    # 畫點東西
    # ...

    pygame.display.update() # 更新畫面

    clock.tick(FPS) # 控制 FPS
有一個黑色視窗就代表你成功了
0. 基礎中的基礎
1. 遊戲程式的架構
1. 遊戲程式的架構
看不懂啦
Code
# 引入函式庫
import pygame
import sys

# 設定常數
WINDOW_WIDTH = 800
WINDOW_HEIGHT = 300
FPS = 60

# 建立 pygame 視窗
pygame.init()
window = pygame.display.set_mode((WINDOW_WIDTH, WINDOW_HEIGHT))
clock = pygame.time.Clock()

# 顏色的 RGB 色碼
BLACK = (0, 0, 0)
WHITE = (255, 255, 255)

# 主迴圈
while True:
    for event in pygame.event.get(): # 事件擷取
        # 退出操作
        if event.type == pygame.QUIT:
            pygame.quit()
            sys.exit()

    # 每幀該做的事情
    window.fill(BLACK) # 清空畫布
    # 畫點東西
    # ...

    pygame.display.update() # 更新畫面

    clock.tick(FPS) # 控制 FPS
1. 遊戲程式的架構
1. 引入函式庫
分段說明
import pygame
import sys
2. 設定常數
WINDOW_WIDTH = 800     # 視窗寬度
WINDOW_HEIGHT = 300    # 視窗高度
FPS = 60               # 幀率
常數:不能被程式碼更改的數
通常用全部大寫命名
1. 遊戲程式的架構
3. 建立遊戲
分段說明
pygame.init()                                                     # 初始化 pygame
window = pygame.display.set_mode((WINDOW_WIDTH, WINDOW_HEIGHT))   # 建立視窗
clock = pygame.time.Clock()                                       # 計時器
我們會建立好遊戲的視窗 並且存到 window 變數中
還有遊戲的計時器 存入變數 clock
4. 顏色色碼
BLACK = (0, 0, 0)
WHITE = (255, 255, 255)
1. 遊戲程式的架構
5. 主迴圈
分段說明
while True:
    # 以下略
    # ...
這東西就是重複無限次的意思
整個遊戲會被重複執行無限次
6. 事件偵測
for event in pygame.event.get():  # 事件擷取
    if event.type == pygame.QUIT: # 使用者按下 X ?
        pygame.quit()             # 退出 pygame
        sys.exit()                # 退出整個程式
事件:發生的事情 今天可能不會細講
如果發生了使用者按下 X 的事件就退出遊戲
1. 遊戲程式的架構
7. 算數學
分段說明
# 數學呢 ???先別急
8. 畫東西
window.fill(BLACK) # 把視窗塗滿黑色
# 畫點東西
# 東西呢 ???
畫東西之前 我們會先把視窗塗滿黑色 (清空畫面)
等等會教
接下來可以畫點東西 可是現在還沒教到
1. 遊戲程式的架構
9. 更新畫面
分段說明
pygame.display.update()告訴 pygame 更新一下畫面
10. 等待一下
clock.tick(FPS)用計時器把遊戲控制在 60 FPS
1. 遊戲程式的架構
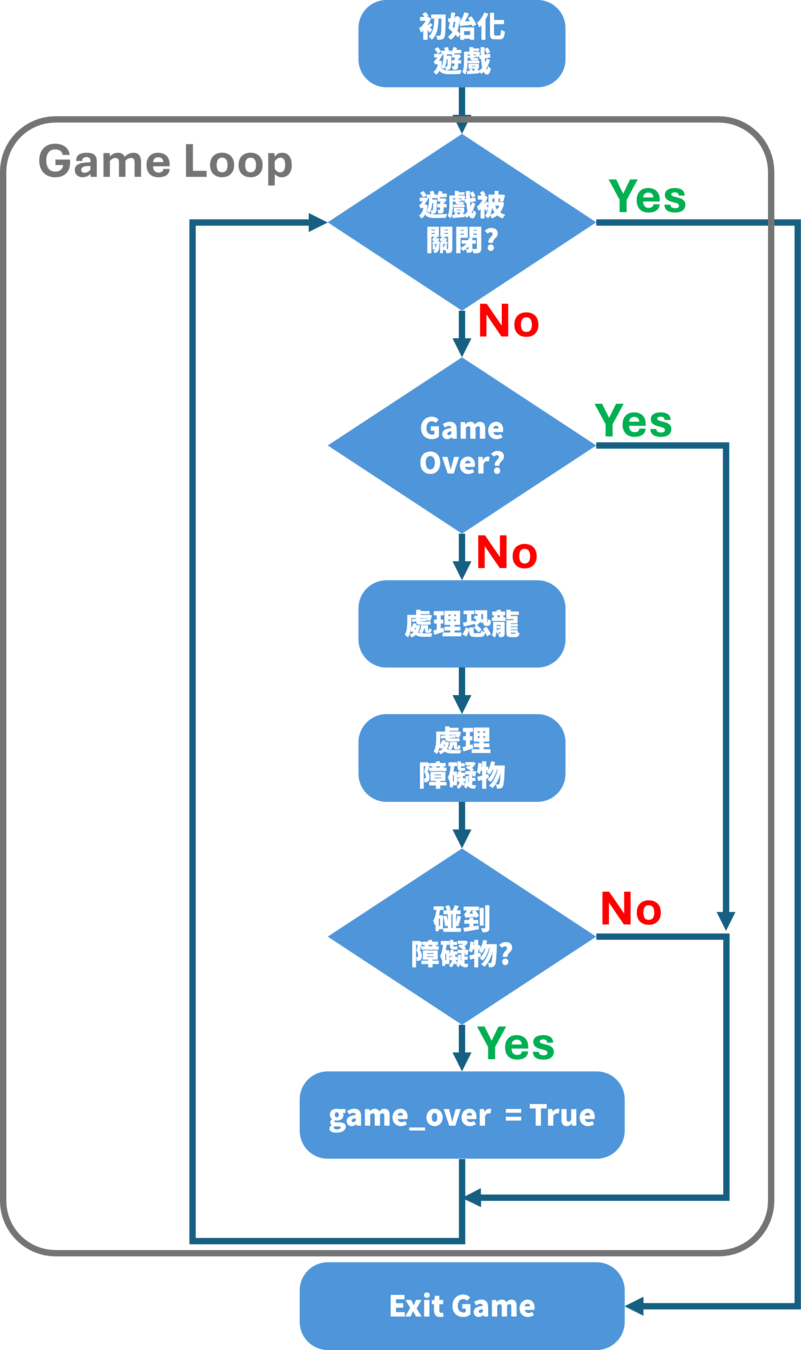
Game Loop
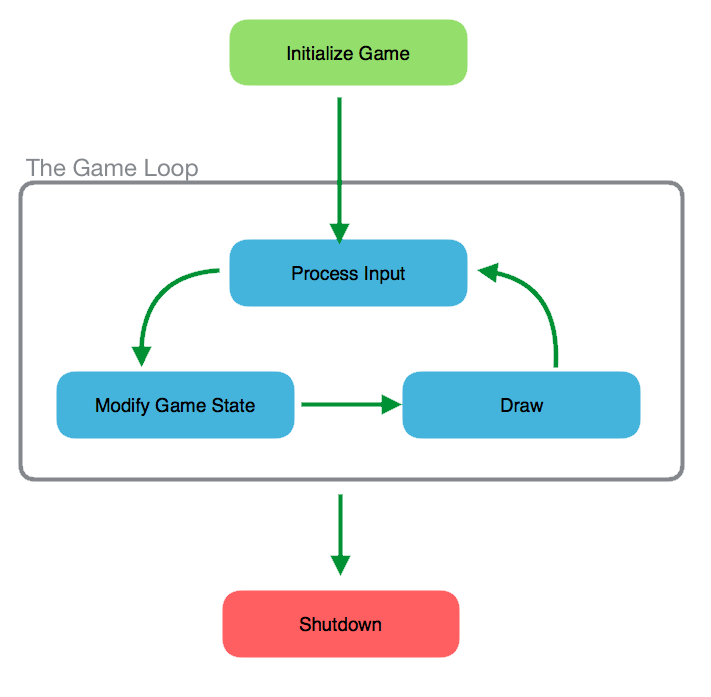
在主迴圈中 我們會做這幾件事情
1. 偵測輸入
2. 更新各變數的值
3. 繪製遊戲畫面
4. 等待一下下
2. Pygame 的基礎操作
2. Pygame 的基礎操作
這裡可以參考各種 draw:
https://www.pygame.org/docs/ref/draw.html
另外,如果你有足夠的程式實力,非常不建議使用今天教的方法寫遊戲,推薦使用 pygame.sprite 和包裝成物件導向 (OOP):
https://www.pygame.org/docs/ref/sprite.html
2. Pygame 的基礎操作
window: 視窗
畫長方形
pygame.draw.rect(window, color,
         (rect_x, rect_y, rect_width, rect_height))
color: 顏色
rect_x, rect_y: 長方形左上角的 x, y 座標
rect_width, rect_height: 長方形的寬、高
pygame.draw.rect(window, CYAN, (100, 100, 200, 100))Ex.
2. Pygame 的基礎操作
window: 視窗
畫線段
pygame.draw.line(window, color,
         (start_x, start_y),
         (end_x, end_y),
         width)
color: 顏色
start_x, start_y: 起始 x, y
end_x, end_y: 結束 x, y
pygame.draw.line(window, YELLOW, (0, 500), (800, 500), 5)Ex.
2. Pygame 的基礎操作
範例 : 畫一條直線&一個長方形
# 引入函式庫
import pygame
import sys

# 設定常數
WINDOW_WIDTH = 800
WINDOW_HEIGHT = 600
FPS = 60

# 建立 pygame 視窗
pygame.init()
window = pygame.display.set_mode((WINDOW_WIDTH, WINDOW_HEIGHT))
clock = pygame.time.Clock()

# 顏色的 RGB 色碼
BLACK = (0, 0, 0)
WHITE = (255, 255, 255)
CYAN = (0, 255, 255)
YELLOW = (255, 255, 0)

# 主迴圈
while True:
    for event in pygame.event.get():
        if event.type == pygame.QUIT:
            pygame.quit()
            sys.exit()

    # 每幀該做的事情
    window.fill(BLACK) # 把視窗塗成黑色 (清空畫面)
    pygame.draw.rect(window, CYAN, (100, 100, 200, 100)) # 畫長方形
    pygame.draw.line(window, YELLOW, (0, 500), (800, 500), 5) # 畫線

    pygame.display.update() # 更新畫面
    clock.tick(FPS) # 控制 FPS
2. Pygame 的基礎操作
按鍵偵測
- 當你按下按鍵時,會觸發一個事件 event
- 但是這樣就會有問題
- 只有按下 or 放開的瞬間會產生 event
- 所以我們用另一種方法
keys = pygame.key.get_pressed()for event in pygame.event.get():
if event.type == pygame.KEYDOWN:
if event.key == pygame.K_a:
print("A is pressed")第一種方法
2. Pygame 的基礎操作
按鍵偵測
Ex.
if keys[pygame.K_a]:
    print("A is pressed")
else:
    print("A is not pressed")
keys = pygame.key.get_pressed()- 會回傳一個 tuple 存入變數 keys
- 指的是找出每個按鍵是否導通 (True of False)
- 可以用這樣的語法查詢
keys[pygame.K_<按鍵>] # True or False2. Pygame 的基礎操作
範例 : 可以用按鍵移動的方塊
補充一下關於移動的實作
先把方塊的 x, y 存成變數
rect_x = 100
rect_y = 100
rect_width = 100
rect_height = 100
變數的用處: 可以修改 !
if keys[pygame.K_UP]: # 判斷按鍵被按下?
    rect_y -= 5
if keys[pygame.K_DOWN]:
    rect_y += 5
if keys[pygame.K_LEFT]:
    rect_x -= 5
if keys[pygame.K_RIGHT]:
    rect_x += 5
2. Pygame 的基礎操作
範例 : 可以用按鍵移動的方塊
import pygame
import sys

WINDOW_WIDTH = 800
WINDOW_HEIGHT = 600
FPS = 60

pygame.init()
window = pygame.display.set_mode((WINDOW_WIDTH, WINDOW_HEIGHT))
clock = pygame.time.Clock()

BLACK = (0, 0, 0)
WHITE = (255, 255, 255)
CYAN = (0, 255, 255)
YELLOW = (255, 255, 0)

rect_x = 100
rect_y = 100
rect_width = 100
rect_height = 100

while True:
    for event in pygame.event.get():
        if event.type == pygame.QUIT:
            pygame.quit()
            sys.exit()

    keys = pygame.key.get_pressed() # 按鍵偵測


    # 算數學
    if keys[pygame.K_UP]: # 判斷按鍵被按下?
        rect_y -= 5
    if keys[pygame.K_DOWN]:
        rect_y += 5
    if keys[pygame.K_LEFT]:
        rect_x -= 5
    if keys[pygame.K_RIGHT]:
        rect_x += 5

    # 畫圖
    window.fill(BLACK) # 清空畫布
    pygame.draw.rect(window, CYAN,
            (rect_x, rect_y, rect_width, rect_height)) # 畫長方形

    pygame.display.update()
    clock.tick(FPS)
2. Pygame 的基礎操作
小實作:方塊跳躍的動畫
目標:做一個方塊,在按下上方向鍵時可以跳一下 (加上重力加速度)
重力加速度怎麼做 ?


velocity += accelerationx += velocity2. Pygame 的基礎操作
小實作:方塊跳躍的動畫
velocity = -90 # 初速度rect_y += velocity # 速度
velocity += 10 # 加速度加速度實作 (速度是我感性調的
已經知道怎麼寫的電神可以開始寫了 Orz
再補充一點實作細節
2. Pygame 的基礎操作
小實作:方塊跳躍的動畫
細節上他可以分成兩種情況
- 離地
- 接觸地面
不是離地的話才允許起跳
開個變數紀錄是否離地
if keys[pygame.K_UP] and is_jumping == False: # 是否要起跳?
is_jumping = True # 正在跳躍的狀態
velocity = -90
if rect_y + velocity > 500: # 超出地平線
is_jumping = False
rect_y = 500
velocity = 0
# 模擬重力加速度
rect_y += velocity # 速度
velocity += 10 # 加速度2. Pygame 的基礎操作
小實作:方塊跳躍的動畫
import pygame
import sys
WINDOW_WIDTH = 300
WINDOW_HEIGHT = 600
FPS = 60
pygame.init()
window = pygame.display.set_mode((WINDOW_WIDTH, WINDOW_HEIGHT))
clock = pygame.time.Clock()
BLACK = (0, 0, 0)
WHITE = (255, 255, 255)
CYAN = (0, 255, 255)
YELLOW = (255, 255, 0)
rect_x = 125
rect_y = 500
rect_width = 50
rect_height = 50
is_jumping = 0
velocity = 0
while True:
for event in pygame.event.get():
if event.type == pygame.QUIT:
pygame.quit()
sys.exit()
keys = pygame.key.get_pressed() # 按鍵偵測
if keys[pygame.K_UP] and is_jumping == False: # 是否要起跳?
    is_jumping = True # 正在跳躍的狀態
    velocity = -90

if rect_y + velocity > 500: # 超出地平線
    is_jumping = False
    rect_y = 500
    velocity = 0

# 模擬重力加速度
rect_y += velocity # 速度
velocity += 10 # 加速度
window.fill(BLACK) # 清空畫布
pygame.draw.rect(window, CYAN,
(rect_x, rect_y, rect_width, rect_height)) # 畫長方形
pygame.display.update()
clock.tick(FPS)
2. Pygame 的基礎操作
圖片會存入變數 img 中
載入圖片
img = pygame.image.load("path/to/img") # 載入的圖片存入變數中window.blit(img, (x, y)) # (x, y) 表示左上角座標接下來把圖片繪製到視窗上
2. Pygame 的基礎操作
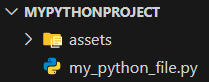
這裡我會用相對路徑的方式載入檔案
載入圖片
也推薦大家這樣做
2. Pygame 的基礎操作
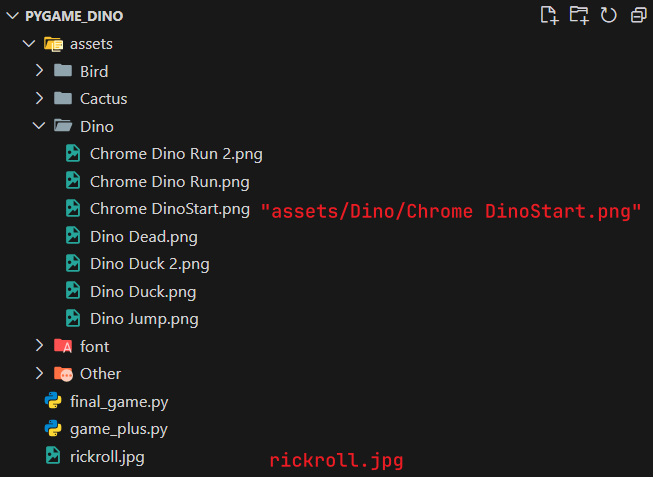
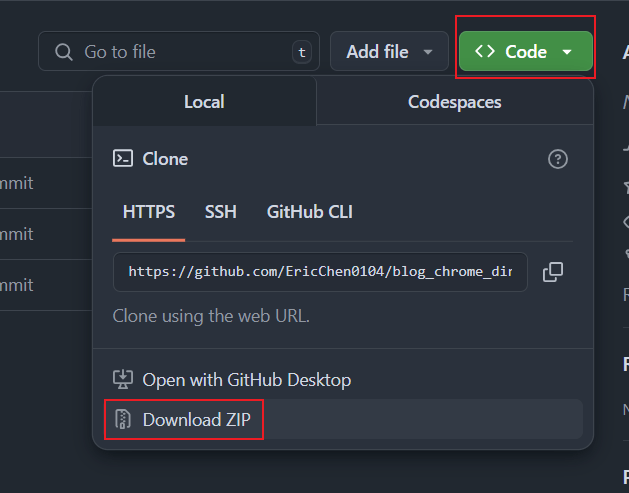
https://github.com/EricChen0104/blog_chrome_dino/
我們會使用這個Repo中提供的 assets 來做恐龍遊戲
(感謝大佬提供圖檔 orz)
載入圖片
先 download zip ,解壓後後把 assets 放到跟程式碼同個資料夾下
2. Pygame 的基礎操作
範例:繪製恐龍
import pygame
import sys

WINDOW_WIDTH = 400
WINDOW_HEIGHT = 300
FPS = 60

pygame.init()
window = pygame.display.set_mode((WINDOW_WIDTH, WINDOW_HEIGHT))
clock = pygame.time.Clock()

BLACK = (0, 0, 0)
WHITE = (255, 255, 255)

dino_img = pygame.image.load(
    "assets/Dino/Chrome DinoStart.png"
) # 用相對路徑載入圖片

while True:
    for event in pygame.event.get():
        if event.type == pygame.QUIT:
            pygame.quit()
            sys.exit()

    window.fill(WHITE) # 背景用白色

    window.blit(dino_img, (100, 100)) # 畫恐龍

    pygame.display.update()

    clock.tick(FPS)
2. Pygame 的基礎操作
小實作 : 恐龍走路動畫
這就當小練習啦
先載入兩張走路的圖片
# 存成 list
DINO_RUNNING_IMGS = [
    pygame.image.load("assets/Dino/Chrome Dino Run.png"),
    pygame.image.load("assets/Dino/Chrome Dino Run 2.png")
]
然後用變數記現在是第幾幀
current_frame = 0想想怎麼樣切換兩張圖吧
2. Pygame 的基礎操作
小實作 : 恐龍走路動畫
如果你寫出來的是
while True:
    for event in pygame.event.get():
        # 略

    window.fill(WHITE)

    window.blit(
        DINO_RUNNING_IMGS[current_frame % 2],
        (80, 310)
    )

    current_frame = current_frame + 1

    pygame.display.update()

    clock.tick(FPS)
恐龍會用 60 FPS 的速度走路欸
直接調低 FPS? 先不要
2. Pygame 的基礎操作
小實作 : 恐龍走路動畫
可以用整數除法 (無條件捨去)
window.blit(
    DINO_RUNNING_IMGS[current_frame // 5],
    (80, 310)
) # 用整數除法來取出圖片的 index
記得處理好數字範圍 (取模)
current_frame = (current_frame + 1) % 10 # 取餘數:讓計數器回到 02. Pygame 的基礎操作
小實作 : 恐龍走路動畫
import pygame
import sys

WINDOW_WIDTH = 1100
WINDOW_HEIGHT = 600
FPS = 60

pygame.init()
window = pygame.display.set_mode((WINDOW_WIDTH, WINDOW_HEIGHT))
clock = pygame.time.Clock()

BLACK = (0, 0, 0)
WHITE = (255, 255, 255)

DINO_RUNNING_IMGS = [
    pygame.image.load("assets/Dino/Chrome Dino Run.png"),
    pygame.image.load("assets/Dino/Chrome Dino Run 2.png")
] # 載入圖片

current_frame = 0 # 用變數紀錄目前的幀數

while True:
    for event in pygame.event.get():
        if event.type == pygame.QUIT:
            pygame.quit()
            sys.exit()

    window.fill(WHITE)

    window.blit(
        DINO_RUNNING_IMGS[current_frame // 5],
        (80, 310)
    ) # 用整數除法來取出圖片的 index

    current_frame = (current_frame + 1) % 10 # 取餘數:讓計數器回到 0

    pygame.display.update()

    clock.tick(FPS)
2. Pygame 的基礎操作
顯示文字
先載入字體然後存入變數 font
font = pygame.font.SysFont("Font Name", font_size) # 載入系統的字體
font = pygame.font.Font("path/to/ttf/file", font_size) # 載入字體的檔案
接下來渲染文字
text = font.render("Something You Wanna Say", True, color)
# 第二個參數 True 代表使用防毛邊字體,如果你不希望字體的畫質很低建議開啟
最後用把文字貼到視窗上
window.blit(text, (x, y))2. Pygame 的基礎操作
範例 : 繪製文字
import pygame
import sys

WINDOW_WIDTH = 600
WINDOW_HEIGHT = 200
FPS = 60

pygame.init()
window = pygame.display.set_mode((WINDOW_WIDTH, WINDOW_HEIGHT))
clock = pygame.time.Clock()

BLACK = (0, 0, 0)
WHITE = (255, 255, 255)

# 載入字體
# font = pygame.font.SysFont("Consolas", 30) # 從系統字體
font = pygame.font.Font("assets/font/ARCADECLASSIC.TTF", 30) # 從檔案

# 渲染字體
text = font.render("Never Gonna Give You Up", True, BLACK)

while True:
    for event in pygame.event.get():
        if event.type == pygame.QUIT:
            pygame.quit()
            sys.exit()

    window.fill(WHITE)

    # 繪製字體到螢幕上
    window.blit(text, (100, 80))

    pygame.display.update()

    clock.tick(FPS)
3. 遊戲實作
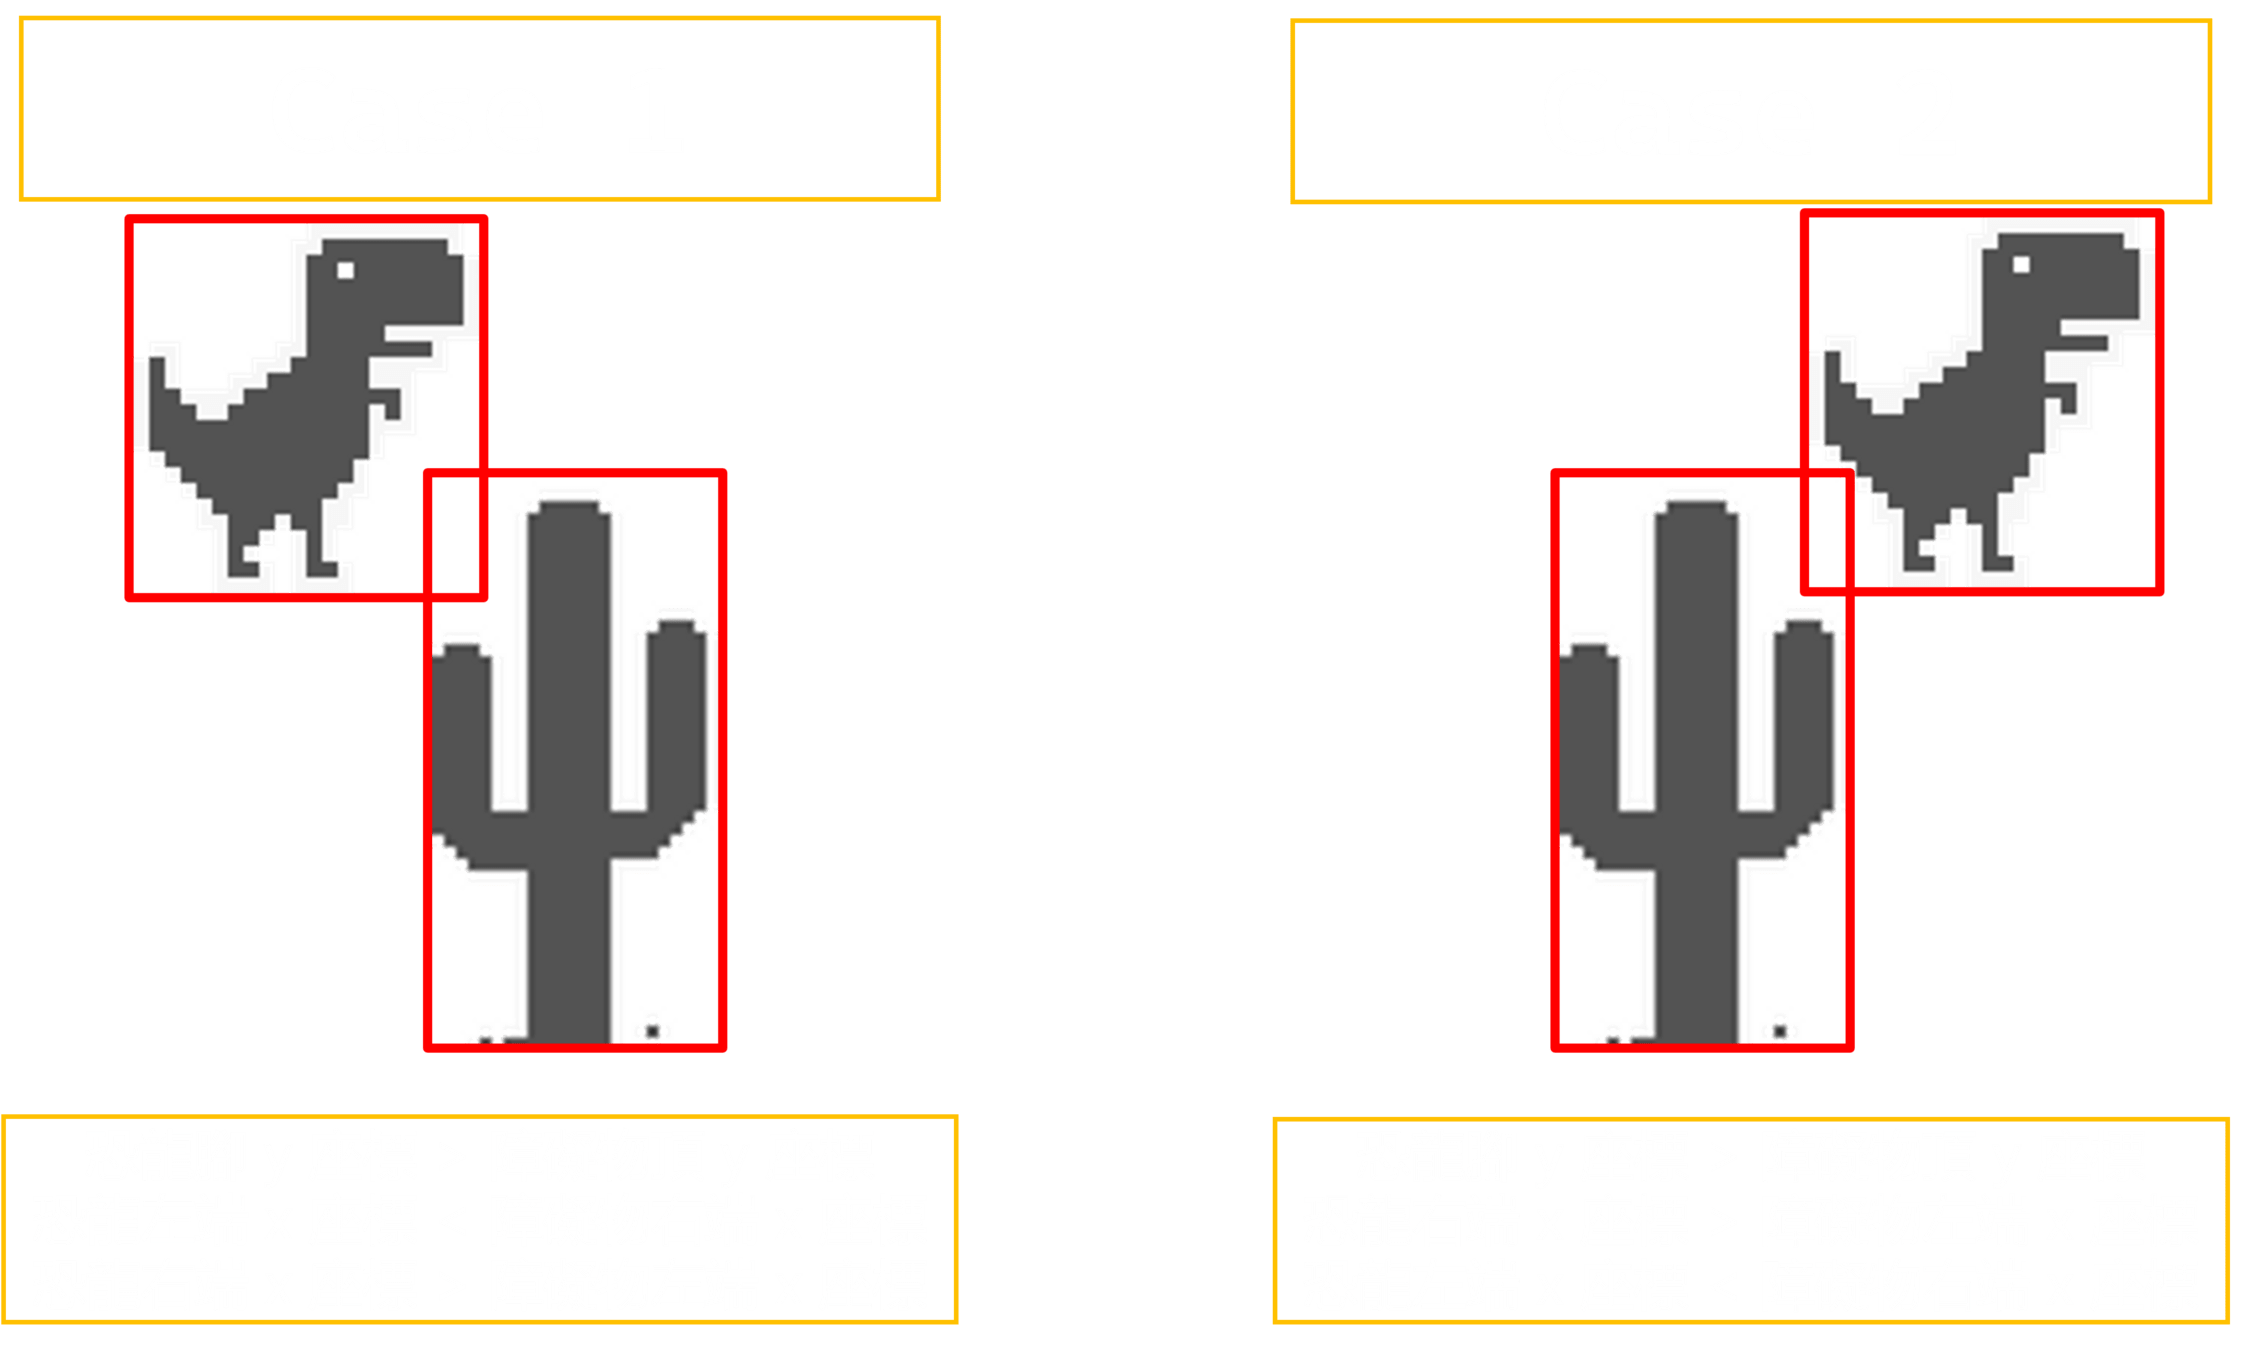
3. 遊戲實作
恐龍 : 走路、跳躍
遊戲流程圖
會寫的大電神可以先開寫了
障礙物 : 移動、生成
3. 遊戲實作
地板 + 障礙物實作
首先是遊戲常數
WINDOW_WIDTH = 1100
WINDOW_HEIGHT = 600

GRAY = (150, 150, 150)  # 地板的顏色

floor_y = 400  # 地板 y 座標

obstacle_y = 305  # 障礙物 y 座標
地板我們畫直線就好
pygame.draw.line(window, GRAY, (0, floor_y),
                 (WINDOW_WIDTH, floor_y), 2)  # 地板
3. 遊戲實作
地板 + 障礙物實作
障礙物用 Chrome Dinosaur Large Cactus.png
OBSTACLE_IMG = pygame.image.load(
    "assets/Cactus/Chrome Dinosaur Large Cactus.png"
)  # 載入障礙物圖片
障礙物我會隨機生成它的位置
隨機數的使用方法
import random  # 引入隨機函式庫

obstacle_x = WINDOW_WIDTH + random.randint(10, 300)  # 障礙物 x 座標
3. 遊戲實作
地板 + 障礙物實作
如果障礙物超出左邊螢幕 -> 重新生成它的位置
if obstacle_x < 0:  # 障礙物碰到最左?
    obstacle_x = WINDOW_WIDTH + \
        random.randint(10, 300)  # 給他一個新的位置
else:
    obstacle_x -= 10  # 移動障礙物
記得要繪製障礙物
window.blit(OBSTACLE_IMG, (obstacle_x, obstacle_y)) # 繪製障礙物3. 遊戲實作
地板 + 障礙物實作
import pygame
import sys
import random  # 隨機數字

WINDOW_WIDTH = 1100
WINDOW_HEIGHT = 600
FPS = 60

pygame.init()
window = pygame.display.set_mode((WINDOW_WIDTH, WINDOW_HEIGHT))
clock = pygame.time.Clock()

BLACK = (0, 0, 0)
WHITE = (255, 255, 255)
GRAY = (150, 150, 150)  # 地板的顏色

OBSTACLE_IMG = pygame.image.load(
    "assets/Cactus/Chrome Dinosaur Large Cactus.png"
)  # 載入障礙物圖片

floor_y = 400  # 地板 y 座標

obstacle_x = WINDOW_WIDTH + random.randint(10, 300)  # 障礙物 x 座標
obstacle_y = 305  # 障礙物 y 座標

while True:
    for event in pygame.event.get():
        if event.type == pygame.QUIT:
            pygame.quit()
            sys.exit()

    if obstacle_x < 0:  # 障礙物碰到最左?
        obstacle_x = WINDOW_WIDTH + \
            random.randint(10, 300)  # 給他一個新的位置
    else:
        obstacle_x -= 10  # 移動障礙物

    window.fill(WHITE)  # 背景用白色

    window.blit(OBSTACLE_IMG, (obstacle_x, obstacle_y))  # 繪製障礙物

    pygame.draw.line(window, GRAY, (0, floor_y),
                     (WINDOW_WIDTH, floor_y), 2)  # 地板

    pygame.display.update()

    clock.tick(FPS)
3. 遊戲實作
恐龍走路 + 跳躍
把前面小實作的東西合併一下
如果恐龍正在跳躍那麼就畫 Dino Jump.png
否則就是跑走路動畫
而遊戲開始可以用 DinoStart.png
有一個實作上的細節 就是可以把圖片存入變數中
把繪製的指令和選擇使用哪張圖的程式碼分開
3. 遊戲實作
恐龍走路 + 跳躍
import pygame
import sys

WINDOW_WIDTH = 1100
WINDOW_HEIGHT = 600
FPS = 60

pygame.init()
window = pygame.display.set_mode((WINDOW_WIDTH, WINDOW_HEIGHT))
clock = pygame.time.Clock()

BLACK = (0, 0, 0)
WHITE = (255, 255, 255)
GRAY = (150, 150, 150)  # 地板的顏色

DINO_RUNNING_IMGS = [
    pygame.image.load("assets/Dino/Chrome Dino Run.png"),
    pygame.image.load("assets/Dino/Chrome Dino Run 2.png")
]  # 恐龍走路圖片

DINO_JUMPING_IMG = pygame.image.load(
    "assets/Dino/Dino Jump.png"
)  # 恐龍跳躍圖片

floor_y = 400    # 地板 y 座標

dino_img = pygame.image.load("assets/Dino/Chrome DinoStart.png")

dino_x = 80      # 恐龍 x 座標
dino_y = 310     # 恐龍 y 座標

dino_is_jumping = 0     # 恐龍正在跳 (true or false)
dino_y_velocity = 0     # 恐龍 y 方向的速度

current_frame = 0   # 用變數紀錄目前的幀數

while True:
    for event in pygame.event.get():
        if event.type == pygame.QUIT:
            pygame.quit()
            sys.exit()

    keys = pygame.key.get_pressed()  # 按鍵偵測

    if keys[pygame.K_UP] and dino_is_jumping == False:
        dino_is_jumping = True  # 正在跳躍的狀態
        dino_y_velocity = -30

    if dino_y + dino_y_velocity > 310:  # 超出地平線
        dino_is_jumping = False
        dino_y = 310
        dino_y_velocity = 0

    # 物理模擬
    dino_y += dino_y_velocity  # 速度
    dino_y_velocity += 2  # 加速度

    if dino_is_jumping == True:
        dino_img = DINO_JUMPING_IMG  # 恐龍跳躍圖片

    else:  # dino_is_jumping == False
        dino_img = \
            DINO_RUNNING_IMGS[current_frame // 5] # 恐龍走路的圖片

    current_frame = (current_frame + 1) % 10  # 取餘數:讓計數器回到 0

    window.fill(WHITE)

    window.blit(dino_img, (dino_x, dino_y))  # 繪製恐龍
    pygame.draw.line(window, GRAY, (0, floor_y),
                     (WINDOW_WIDTH, floor_y), 2)  # 地板

    pygame.display.update()

    clock.tick(FPS)
3. 遊戲實作
碰撞偵測
因為技術實力不足 我們先假設恐龍和障礙物是長方形的
3. 遊戲實作
碰撞偵測
偵測算法可以寫成這樣
if (dino_bottom_y > obstacle_y
        and dino_x < obstacle_right_x
        and dino_right_x > obstacle_x):
    print("Collided")
如何取出圖片大小 ?
img_width, img_height = img.get_size()
img_bottom_y = img_y + img_height
img_right_x = img_x + img_width
3. 遊戲實作
碰撞偵測
合併前面的東西 + 碰撞偵測
import pygame
import random
import sys

WINDOW_WIDTH = 1100
WINDOW_HEIGHT = 600
FPS = 60

pygame.init()
window = pygame.display.set_mode((WINDOW_WIDTH, WINDOW_HEIGHT))
clock = pygame.time.Clock()

BLACK = (0, 0, 0)
WHITE = (255, 255, 255)
GRAY = (150, 150, 150)

DINO_RUNNING_IMGS = [
    pygame.image.load("assets/Dino/Chrome Dino Run.png"),
    pygame.image.load("assets/Dino/Chrome Dino Run 2.png")
]  # 恐龍走路圖片

OBSTACLE_IMG = pygame.image.load(
    "assets/Cactus/Chrome Dinosaur Large Cactus.png"
)

DINO_JUMPING_IMG = pygame.image.load(
    "assets/Dino/Dino Jump.png"
)  # 恐龍跳躍圖片

floor_y = 400    # 地板 y 座標

dino_img = pygame.image.load("assets/Dino/Chrome DinoStart.png")

dino_x = 80      # 恐龍 x 座標
dino_y = 310     # 恐龍 y 座標

dino_is_jumping = 0     # 恐龍正在跳 (true or false)
dino_y_velocity = 0     # 恐龍 y 方向的速度

current_frame = 0   # 用變數紀錄目前的幀數

obstacle_x = WINDOW_WIDTH + random.randint(10, 300)
obstacle_y = 305

while True:
    for event in pygame.event.get():
        if event.type == pygame.QUIT:
            pygame.quit()
            sys.exit()

    keys = pygame.key.get_pressed()  # 按鍵偵測

    if keys[pygame.K_UP] and dino_is_jumping == False:
        dino_is_jumping = True  # 正在跳躍的狀態
        dino_y_velocity = -30

    if dino_y + dino_y_velocity > 310:  # 超出地平線
        dino_is_jumping = False
        dino_y = 310
        dino_y_velocity = 0

    # 物理模擬
    dino_y += dino_y_velocity  # 速度
    dino_y_velocity += 2  # 加速度

    if dino_is_jumping == True:
        dino_img = DINO_JUMPING_IMG  # 恐龍跳躍圖片

    else:  # dino_is_jumping == False
        dino_img = \
            DINO_RUNNING_IMGS[current_frame // 5] # 恐龍走路的圖片

    current_frame = (current_frame + 1) % 10  # 取餘數:讓計數器回到 0

    # 處理障礙物
    if obstacle_x < 0:
        obstacle_x = WINDOW_WIDTH + random.randint(10, 300)
    else:
        obstacle_x -= 10

    # 處理碰撞
    dino_width, dino_height = dino_img.get_size()  # 獲取圖片大小
    dino_right_x = dino_x + dino_width  # 右端 x 座標
    dino_bottom_y = dino_y + dino_height  # 下端 y 座標
    obstacle_width, obstacle_height = OBSTACLE_IMG.get_size()
    obstacle_right_x = obstacle_x + obstacle_width

    if (dino_bottom_y > obstacle_y
            and dino_x < obstacle_right_x
            and dino_right_x > obstacle_x):
        print("Collided")


    window.fill(WHITE)

    window.blit(OBSTACLE_IMG, (obstacle_x, obstacle_y))  # 繪製障礙物
    window.blit(dino_img, (dino_x, dino_y))  # 繪製恐龍
    pygame.draw.line(window, GRAY, (0, floor_y),
                     (WINDOW_WIDTH, floor_y), 2)  # 地板

    pygame.display.update()

    clock.tick(FPS)
3. 遊戲實作
Game Over 文字
恭喜大家快寫完了
while True:
    # 偵測退出
    # ...

    if game_over == True:
        window.blit(text, (350, 200))

    else:  # game_over == False
        # 遊戲本體
        # ...
        if 發生碰撞:
            game_over = True
        # ...

        window.fill(WHITE)
        # ...


    pygame.display.update() # 注意縮排層級

    clock.tick(FPS)
處理 Game Over 的部分 可以這樣寫
3. 遊戲實作
完整遊戲程式
import pygame
import random
import sys

WINDOW_WIDTH = 1100
WINDOW_HEIGHT = 600
FPS = 60

pygame.init()
window = pygame.display.set_mode((WINDOW_WIDTH, WINDOW_HEIGHT))
clock = pygame.time.Clock()
font = pygame.font.Font("assets/font/ARCADECLASSIC.TTF", 80)

BLACK = (0, 0, 0)
WHITE = (255, 255, 255)
GRAY = (150, 150, 150)

DINO_RUNNING_IMGS = [
    pygame.image.load("assets/Dino/Chrome Dino Run.png"),
    pygame.image.load("assets/Dino/Chrome Dino Run 2.png")
]  # 恐龍走路圖片

OBSTACLE_IMG = pygame.image.load(
    "assets/Cactus/Chrome Dinosaur Large Cactus.png"
)

DINO_JUMPING_IMG = pygame.image.load(
    "assets/Dino/Dino Jump.png"
)  # 恐龍跳躍圖片

floor_y = 400    # 地板 y 座標

dino_img = pygame.image.load("assets/Dino/Chrome DinoStart.png")

dino_x = 80      # 恐龍 x 座標
dino_y = 310     # 恐龍 y 座標

dino_is_jumping = 0     # 恐龍正在跳 (true or false)
dino_y_velocity = 0     # 恐龍 y 方向的速度

current_frame = 0   # 用變數紀錄目前的幀數

obstacle_x = WINDOW_WIDTH + random.randint(10, 300)
obstacle_y = 305

text = font.render("Game Over", True, BLACK)
game_over = False

while True:
    for event in pygame.event.get():
        if event.type == pygame.QUIT:
            pygame.quit()
            sys.exit()

    if game_over == True:
        window.blit(text, (350, 200))

    else:  # game_over == False
        keys = pygame.key.get_pressed()  # 按鍵偵測

        if keys[pygame.K_UP] and dino_is_jumping == False:
            dino_is_jumping = True  # 正在跳躍的狀態
            dino_y_velocity = -30

        if dino_y + dino_y_velocity > 310:  # 超出地平線
            dino_is_jumping = False
            dino_y = 310
            dino_y_velocity = 0

        # 物理模擬
        dino_y += dino_y_velocity  # 速度
        dino_y_velocity += 2  # 加速度

        if dino_is_jumping == True:
            dino_img = DINO_JUMPING_IMG  # 恐龍跳躍圖片

        else:  # dino_is_jumping == False
            dino_img = \
                DINO_RUNNING_IMGS[current_frame // 5] # 恐龍走路的圖片

        current_frame = (current_frame + 1) % 10  # 取餘數:讓計數器回到 0

        # 處理障礙物
        if obstacle_x < 0:
            obstacle_x = WINDOW_WIDTH + random.randint(10, 300)
        else:
            obstacle_x -= 10

        # 處理碰撞
        dino_width, dino_height = dino_img.get_size()  # 獲取圖片大小
        dino_right_x = dino_x + dino_width  # 右端 x 座標
        dino_bottom_y = dino_y + dino_height  # 下端 y 座標
        obstacle_width, obstacle_height = OBSTACLE_IMG.get_size()
        obstacle_right_x = obstacle_x + obstacle_width

        if (dino_bottom_y > obstacle_y
                and dino_x < obstacle_right_x
                and dino_right_x > obstacle_x):
            print("Collided")
            game_over = True


        window.fill(WHITE)

        window.blit(OBSTACLE_IMG, (obstacle_x, obstacle_y))  # 繪製障礙物
        window.blit(dino_img, (dino_x, dino_y))  # 繪製恐龍
        pygame.draw.line(window, GRAY, (0, floor_y),
                         (WINDOW_WIDTH, floor_y), 2)  # 地板

    pygame.display.update()

    clock.tick(FPS)
3. 遊戲實作
好欸寫完了
所以
3. 遊戲實作
成發能做的事
- 自己寫個遊戲 (確信)
或是你可以加這幾個東西 (圖檔都有給)
- 恐龍死亡
- 計分數
- 把地面改成貼圖
-
寫多個障礙物 (提示: 用
list) - 寫恐龍蹲 + 飛鳥
- 畫背景的雲
以上這些原教學文章都有教欸 (附在參考資料)
不過原文章是用物件導向寫的 也推薦大家參考
(反而不推薦大家用今天的寫法)
真的以上都不會 你也可以
- 學點美工 幫遊戲換 skin
- 寫機器人 (好欸)
-
初學者 Pygame 超詳細實戰教學:一步步帶你撰寫 Chrome Dino 小遊戲 (沒錯我的
assets是從這裡偷的)
https://vocus.cc/article/6739a977fd89780001b439c1
參考資料
- Object-Oriented Python: Master OOP by Building Games and GUIs (Book)
-
程序員做飯指南https://cook.aiursoft.cn/
Thanks

pygame
By Roy Chuang


